Friday, November 24, 2017

Perler Bead Thanksgiving Tray

Hello Perler...ers and Happy Thanksgiving.
Today we are going to make a "Thanksgiving tray"

For this project you are going to need:
⚫282 Dark Green beads
⚫369 Brown beads
⚫68 Glow in the Dark Orange beads (or clear Orange)
⚫58 Orange beads
⚫Large square pegboard
⚫iron
⚫ironing paper, or parchment paper

First, place your beads on the pegboard in these patterns.↓ 

Base piece 
Side panels X2  
Front and back pieces 

Next, place on your ironing/parchment paper,
 and iron until smooth

And snap the pieces into place

Now you have your Thanksgiving tray. you could use this for multiple purposes.
here are a few of them.
pantry organizer
coaster set holder 
mini pegboard holder
spice holder

If you made this please leave a comment and tell me what you used it for.
Thanks for reading, and look for more Perler...ing next Friday.

And remember to vote for your favorite color of beads. poll is on the right of this page near the top. 

Friday, November 17, 2017

Fall Perler Candy Dish

Hello Perler...ers Today's project is really tricky, but you won't regret making it.
We are going to make a Fall Candy Dish.


You will need:

⚫72 Orange Beads
⚫64 Brown Beads
⚫40 Dark Green beads
⚫Small bowl
⚫Iron
⚫Ironing paper, or Parchment paper
⚫Large square pegboard
⚫2 Tablespoons Candy, Nuts, or any small treat

First you need to place your beads on your pegboard in this pattern ↓


Place your Ironing/Parchment paper on top, and iron until smooth.


Take your project off the board while it is still hot, and immediately place it into a bowl↓ and push down on the Orange square in the middle of your project.


←Ouch


You will want to wear gloves because it will be hot, REALLY hot.  (I learned that the hard way🔥)

Hold it in place for about 1 minute.
then take it out of the bowl and let it cool all the way.

The fill it with any small treat that you want.
It will hold up to 2-3 Tablespoons.


You can set it out on your coffee table for company, or put it on your desk, you could do all sorts of stuff with it.
You could even make a whole boatload of them, and use them to store your beads.


 I hope you enjoyed making this Candy Dish,
And look for more Perler...ing next Friday.


And please don't forget to vote for your favorite color beads, poll is on the right side of this page. (near the top)
 Thanks for reading.

Friday, November 10, 2017

Fall Checkered Key Chain Hanger

Hello Perler..ers, Today I am going to show you how to make a fall checkered key hanger.

   
you will need

⚫75 orange beads
⚫29 brown beads
⚫Pegboard
⚫iron
⚫ironing paper (or parchment paper)
⚫double sided sticky foam
⚫something small and round like a flashlight
⚫ key chain

First put your beads on the peg board with this pattern ↓


Then put your Ironing paper on top, and iron until smooth, then iron the other side.


immediately after you take the iron off, wrap the project half way around the flashlight, and hold in place until it is cooled of (you might want to wear gloves because it will be hot)


After it has cooled put a piece of double sided sticky foam on the back and stick it where ever you want.


You could do all kinds of things with this little project, thanks for reading, let me know what you want to see in the future, and stay tuned for more Perler...ing.

Also please don't forget to vote for you favorite color of beads. 

Friday, November 3, 2017

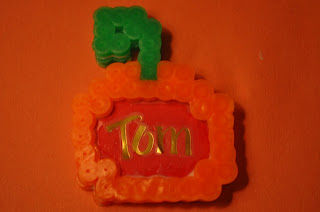
Perler Pumpkin Frame

Hello fellow Perler...ers today is the first of many projects on Pixel Perler Project. We are going to make a Perler bead pumpkin frame.

For this project you are going to need

⚫11 green Perler beads
⚫95 orange Perler beads
⚫Picture of you or your friend, or piece of construction paper (color of your choice)
⚫ironing paper, or parchment paper
⚫iron
⚫square peg bored
⚫alphabet stickers (optional)

To start off, place your beads on the peg board with this ↓ pattern.
 
Back portion
Front portion

Then put your ironing paper on top and iron, and then flip it over and do the other side.

Add Next you need your picture, or piece of construction paper, you could use any color you wish but I will be using red.

Cut your paper into a 1 1/8 in, by 1 1/4 in piece.


Glue it to the back portion of your pumpkin.


Then glue the top on.


Wait for it to dry, if you are using a picture you can stop here, but if you are using parchment paper then you can use your favorite alphabet stickers to write you name.


When it is done you can give it to a friend or
enjoy it yourself.


I hope you enjoyed making this pumpkin, and please leave a comment to let me know what you would like to see in the future. and stay tuned for more Perler...ing.

Also, don't forget vote for your favorite Perler Bead color.

Easter Egg Decoration

Hello Perler...ers Happy Easter, welcome back to Pixle Perler Project, today we are going to make an Easter Egg Decoration, For this Projec...